Rendering ports in JsPlumb

What are ports?
Ports are a fundamental part of JsPlumb's data model. The best analogy from the computing world for JsPlumb's concept of ports is that of TCP ports: they are a unique identifier on some vertex that can act as the source and/or target of one or more edges.
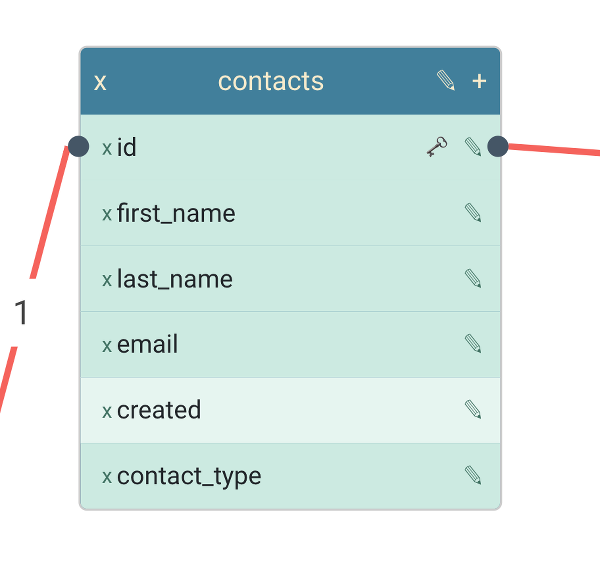
Ports are useful when you need granularity in your data model. We use them in several of our starter apps and demonstrations. For instance, in the Schema builder, a table is represented as a node in the data model, and each of the columns in the table is represented as a port on the table vertex. You can see this in the image on the left below. Another example - the purple node on the right below - is from the Chatbot builder. This is a "choice" node, where the path followed depends on which option from a set of choices is selected - each choice (here the choices are PIN or Password) is modelled as a port on the choice vertex.
|
|

So, to take the chatbot as an example, in the data model we'd have something like this as an output of the image above:
edges:[
    {
        "source":"selectLogin.PIN",
        "target":"pinSelected"
    },
    {
        "source":"selectLogin.Password",
        "target":"passwordSelected"
    }
]
I was prompted to write this article after receiving some feedback that there is "no demo with ports" on our homepage. As we can see from the above two examples, that is not the case, but the UI in the two apps shown above does not make the presence of ports as explicit as in some other demos you'll see kicking around the internet.
Logical ports
As with TCP ports, a port in JsPlumb is at the very least a logical concept: any edges connected to that port will be shown to be connected to the port's vertex in the UI, in the absence of a specific DOM element representing the port. In the two apps shown above, though, we do have a DOM element representing each port, because we clearly want to show edges connected to the ports and not to their parent.
Physical ports
By "physical" we mean we've written out a DOM element to represent each port, and JsPlumb has a powerful declarative mechanism for doing so, using a set of data-jtk- attributes. Here is the markup (slightly abridged for clarity) for the table node from the schema builder:
<div class="jtk-schema-table">
  <span>{{name}}</span>
  <div class="jtk-schema-columns">
   <r-each in="columns" key="id">
    <div class="jtk-schema-table-column" data-type="{{datatype}}"
         data-primary-key="{{primaryKey}}"
         data-jtk-port="{{id}}" data-jtk-scope="{{datatype}}"
         data-jtk-source="true" data-jtk-target="true">
     <div><span>{{name}}</span></div>
    </div>
   </r-each>
  </div>
</div>
and for the choice node in the chatbot builder:
<div class="jtk-chatbot-choice" data-jtk-target="true">
  <div class="jtk-delete"></div>
  {{message}}
  <div class="jtk-choice-add"></div>
  <r-each in="choices" key="id">
    <div class="jtk-chatbot-choice-option" data-jtk-source="true"
      data-jtk-port-type="choice" data-jtk-port="{{id}}">
        {{label}}
        <div class="jtk-choice-delete"></div>
    </div>
  </r-each>
</div>
JsPlumb allows you to use any HTML you like to render DOM elements that represent ports. The data-jtk- attributes, discussed in detail on this page in our docs give you a powerful decoupled mechanism to tell JsPlumb about what parts of your data model the various DOM elements represent.
Rendering ports
So as I said before, I was prompted to write this post to clear up a misunderstanding about whether or not JsPlumb could render ports. I think perhaps there was just nothing that looked like ports. Here, I've embedded a cut-down version of the original chatbot builder, without any of the extra stuff like drag/drop, the inspector, etc. It all still works - try clicking the plus button on the Select logon method node, for example, to add a new port to that node:
And here, I've made a few minor changes to the markup and the CSS, and suddenly our app has a whole new skin (try clicking the plus button again!):
The changes really were very minor. For example the new markup for a choice component is:
<div class="jtk-chatbot-choice jtk-chatbot-2" data-jtk-target="true" data-jtk-port-type="target">
  <div class="jtk-delete"></div>
  {{message}}
  <div class="jtk-choice-add"></div>
  <div class="jtk-chatbot-choices">
    <r-each in="choices" key="id">
      <div class="jtk-chatbot-choice-option" data-jtk-source="true"
             data-jtk-port-type="choice" data-jtk-port="{{id}}">
             {{label}}
             <div class="jtk-choice-delete"></div>
      </div>
    </r-each>
  </div>
</div>
The difference being that I added a <div class="jtk-chatbot-choices"> wrapper around the individual ports; this is styled as a flex row in the CSS and positioned to hang off the bottom of the element.
I also updated the connector type (to Orthogonal) and anchor specification for port elements. Where in the original app we have this anchor for the ports:
anchor:[AnchorLocations.Left, AnchorLocations.Right ]
meaning edges connected to that port can switch from the left to the right depending on where the other end of the edge is connected, in the new version we have this:
anchor:AnchorLocations.Bottom
meaning that an edge connected to one of these ports is fixed to the port's bottom edge.
Further reading
This article only touches on what is a big topic. If you want to delve more into what JsPlumb offers, some good articles to take a look at might be:
- The docs on configuring connectivity
- The available anchor types in JsPlumb
- The various connectors JsPlumb offers
Summary
I hope this post gives you a taster for the flexibility and power that JsPlumb's rendering offers. I can surface the ports in my data model to the user in unlimited ways, since it's all just HTML markup. In this case, with a small markup change, a few CSS updates, and one changed line of code I was able to completely alter the appearance and layout of our Chatbot app.
Start a free trial
Get in touch!
If you'd like to discuss any of the ideas/concepts in this article we'd love to hear from you - drop us a line at hello@jsplumbtoolkit.com.